
Instead of copying caller details into Housecall Pro and chasing appointment requests manually, connect your AI receptionist to Housecall Pro through a verified integration route that transfers qualified leads and returns the booking result. Keep appointment requests unconfirmed until the destination accepts them; collecting a preferred time is not the same as booking it.
- Connect AI receptionist to Housecall Pro only after verifying the connection supports your required lead and appointment actions.
- AL IntelliFlow is best for service businesses that need lead capture, follow-up, and appointment booking.
- Start with lead capture; enable confirmed booking only after customer matching, availability checks, and failure handling pass.
- Stop appointment reminders when a booking changes, and send failed transfers to a named owner.
Why this matters
The receptionist and your scheduling system need to agree about what happened. A caller can finish a conversation while the customer record fails to transfer, or request a time that never becomes an appointment. A successful conversation is not proof of a successful booking.
AL IntelliFlow provides lead capture, qualification, follow-up, and appointment booking for service businesses. Your Housecall Pro connection should carry those outcomes into your operating workflow without making the caller repeat information.
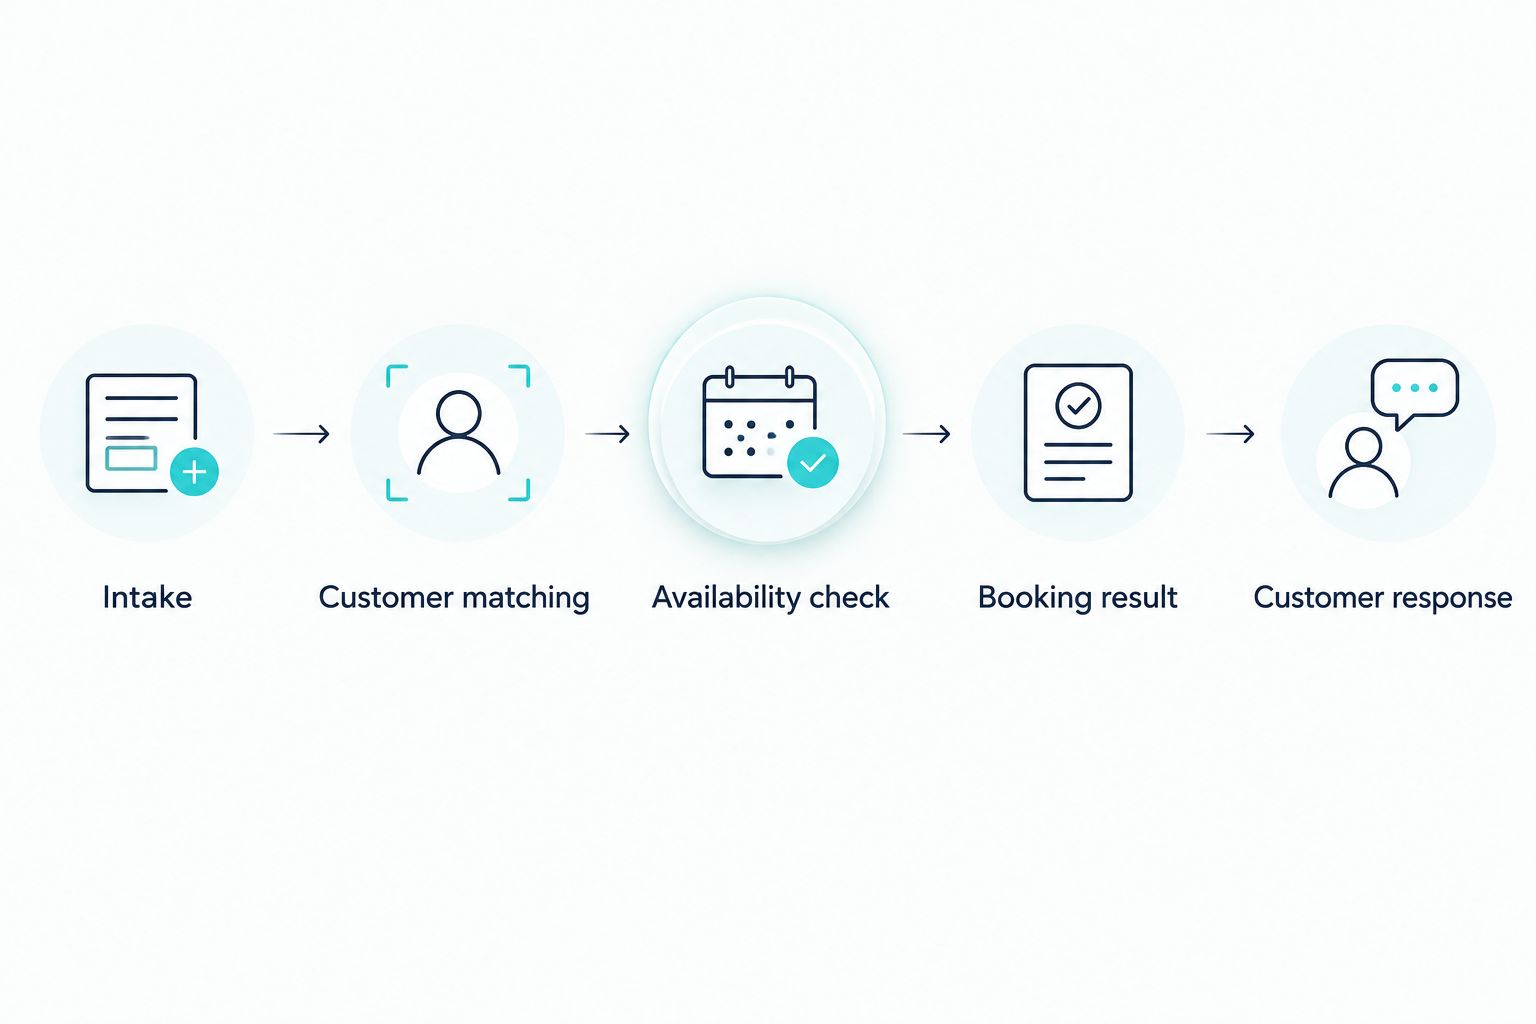
For a 2026 setup, separate three events: receiving the inquiry, recording the customer details, and confirming the appointment. Give each event its own acceptance check. That separation tells you exactly where to intervene when something fails.
Before you start
- Account access: Have an authorized administrator for both systems, plus access to any integration service used between them. Confirm the supported connection method and the exact actions it permits before building the workflow.
- Operating rules: Prepare your service categories, service area, business hours, appointment rules, escalation contact, and approved customer messages. Identify which system controls scheduling decisions.
- The non-obvious gotcha: A connection that creates customer records does not necessarily check scheduling availability or create appointments. Verify each required action separately; do not treat a working lead transfer as permission to promise a booking.
Choose a named workflow owner before setup. That person needs authority to inspect failed transfers, correct records, and pause automation. Access credentials belong in the connection's secure credential storage, not in receptionist instructions or customer notes.
Choose your workflow scope
Start with the smallest workflow that removes a real manual task. Customer capture and confirmed appointment booking have different requirements, so test them separately rather than switching on everything together.
| Workflow | Best for | Advantage | Limitation | Acceptance check |
|---|---|---|---|---|
| Lead capture | Teams that review service requests before scheduling | Transfers inquiry details without promising a slot | Staff still need to approve or schedule the work | The correct customer record receives the request |
| Confirmed booking | Teams with defined scheduling rules and a verified booking connection | Carries the request through to an accepted appointment | Requires availability checks, booking permissions, and failure handling | The destination returns a successful booking result |
Use lead capture as the first implementation milestone. Add confirmed booking after the scheduling actions pass testing. This is a deployment sequence, not a claim that either connection method is available in every account.
AL IntelliFlow fits service-business lead capture and follow-up; the Housecall Pro handoff still needs explicit field mapping and booking rules. The benefit is less repeated data entry. The constraint is that automation must stay within the actions your actual connection supports.
Connection scope and permissions
Verify the integration route
- Ask the account administrators to identify the supported route between the two systems. Establish whether the implementation uses a direct connection, an intermediary, or a custom integration.
- Verify the specific operations you need: finding a customer, creating or updating customer details, transferring a service request, and handling appointments. Check each operation independently.
- Authorize only the access needed for the selected workflow. Keep unrelated administrative actions outside the connection's scope.
- Record the account being connected, the authorization owner, and the procedure for disconnecting it. Recheck these details in your 2026 setup record before testing.
Expected result: You have an authorized connection with a documented list of supported actions. If the required action is unsupported, stop that branch and assign the handoff to staff instead of simulating success.
Define the handoff contract
- Decide what starts a transfer: a completed intake, a qualified service request, or a confirmed appointment request. Choose one precise event for the initial workflow.
- Define what counts as success. Customer creation needs a saved customer reference; appointment booking needs an accepted booking result.
- Define what counts as failure, including rejected requests, missing required information, and responses that never arrive.
- Give failed handoffs a named owner and a review destination. Make the unresolved state visible without sending the caller an inaccurate confirmation.
Expected result: Every attempted handoff ends in a clear success, an actionable failure, or an unresolved state awaiting review. No ambiguous response becomes a booking confirmation.
Customer matching and intake mapping
Map the intake information
Use this table as a mapping worksheet, not as a list of product interface labels. Select the actual destination fields exposed by your verified connection.
| Intake information | Mapping rule | Validation before transfer |
|---|---|---|
| Customer name | Preserve the name supplied by the caller | Do not substitute a business name without confirmation |
| Phone number | Use a consistent format for matching | Confirm the callback number when it is unclear |
| Email address | Transfer only the address actually supplied | Leave absent information empty rather than guessing |
| Service address | Keep the service location distinct from other addresses | Check the address against your service-area rules |
| Service request | Preserve the requested work and relevant notes | Separate caller statements from internal assessments |
| Preferred time | Treat it as a request until booking succeeds | Include the applicable time zone |
- Select the minimum information required for your first workflow. Do not require an email address simply because a mapping slot exists.
- Match an existing customer using identifiers your connection actually supports. Route conflicting matches for review rather than choosing a record arbitrarily.
- Preserve a source reference for the inquiry when the implementation supports one. Use it to distinguish a repeated transfer from a new request.
- Test a returning customer and a new customer. Confirm that the returning customer's inquiry reaches the intended record.
Expected result: The service request reaches the correct customer record with usable contact information. A repeated transfer does not silently create another customer or erase existing details.
Separate facts from decisions
- Transfer what the caller said about the problem, location, and preferred time.
- Apply your qualification rules separately. A service-area decision is an operating rule, not a fact supplied by the caller.
- Send uncertain addresses, conflicting customer matches, and unclear requests to review.
Expected result: Staff can see the original request and understand why automation accepted or escalated it. They do not need to reconstruct the conversation from an unexplained status.
Booking rules and customer responses
Configure the confirmation boundary
- Specify which requests qualify for automatic booking. Route requests requiring an estimate, special equipment, or staff judgment according to your actual operating rules.
- Require an availability check through the supported scheduling route. If that route cannot check availability, collect preferences and hand the request to staff.
- Submit the booking only after the required customer and service information passes validation.
- Wait for the destination's successful booking result before sending an appointment confirmation.
- If the response is unsuccessful or unclear, send an acknowledgment of the request instead. Tell the customer what happens next without implying that a time is reserved.
Expected result: Customer messages match the destination's booking state. An accepted appointment gets a confirmation; a pending request gets an acknowledgment.
The booking sequence should remain explicit in your 2026 workflow documentation. Never use the receptionist's conversational agreement as the confirmation boundary. The system responsible for accepting the appointment determines whether it exists.
Test before enabling live transfers
Run 3 test cases: a new customer, a returning customer, and a request that cannot be booked. Use clearly identified test information and prevent test messages from reaching real customers.
- Submit each test inquiry through the intended intake route.
- Inspect the resulting customer record, service details, and appointment state.
- Compare the customer's response with the destination's actual result.
- Repeat 1 completed test transfer to check duplicate handling.
- Assign 1 workflow owner to review the results and authorize live operation.
Expected result: Accepted requests transfer correctly, rejected requests reach review, and repeated transfers do not create repeated actions. Keep the test results with your 2026 configuration record.
Second workflow: follow up when an appointment changes
Once the initial handoff works, add appointment-change handling if the verified connection exposes the necessary change events or lookup actions. This variant addresses a different problem: follow-up that continues after the customer has canceled or rescheduled.
- Define the changes that matter, such as cancellation or a changed appointment time.
- Match the change to the existing appointment reference. Do not locate an appointment by customer name alone.
- Stop pending messages that refer to the old appointment state.
- Send an updated message only after the changed state is confirmed.
- Route unrecognized or conflicting updates to the workflow owner.
Expected result: Follow-up reflects the current appointment rather than the original request. If appointment updates cannot reach the receptionist automatically, keep those messages under staff control.
For this 2026 expansion, test both cancellation and rescheduling before enabling customer messages. Changing the appointment record and changing the follow-up sequence are separate actions; verify both.
Troubleshooting
The same customer appears more than once
Check whether the workflow searches for an existing customer before creating one. Review phone-number formatting and conflicting identifiers. Where the implementation supports a source reference, use it to recognize repeated delivery of the same inquiry.
The inquiry transfers but no appointment appears
Check the supported actions and the booking response. Customer creation and appointment creation are separate outcomes. Keep the request pending until a verified booking action succeeds or staff complete the scheduling handoff.
The caller receives the wrong appointment time
Inspect the time zone attached to the request and the value sent to the destination. Avoid interpreting a time without its zone. Repeat the test across intake, destination record, and customer message before restoring automatic confirmations.
A transfer stops after account access changes
Check connection authorization and the permissions of the connected account. Restore access through the approved authorization process, then inspect unresolved requests before retrying them. Confirm that a retry will not repeat an action already completed.
Follow-up continues after cancellation
Check whether the cancellation reached the workflow and matched the intended appointment. Verify that pending messages were stopped, not merely that the cancellation was recorded. Pause the affected sequence until both actions work.
Customize your workflow
Expand AL IntelliFlow around your actual dispatch process, not around every automation the connection exposes. Add one operating rule at a time and repeat the acceptance tests after each change.
- Service routing: Send requests outside your service area to review rather than attempting a booking.
- Urgent requests: Define a staff escalation path and the language the receptionist uses while escalating.
- Incomplete intake: Ask for the missing information without creating another inquiry.
- Follow-up ownership: Decide which system sends each customer message so the same request does not trigger competing sequences.
Keep a small change log. Record the rule changed, the test performed, and the person who approved it. A working connection becomes harder to diagnose when booking rules and message rules change without a record.
FAQ
How do I connect an AI receptionist to Housecall Pro?
Verify a supported integration route, authorize the required actions, map intake information, and test the handoff. Treat appointment booking as a separate action that requires its own successful result.
Does AL IntelliFlow automatically confirm Housecall Pro appointments?
Automatic confirmation requires a verified booking connection and an accepted appointment result. Configure the workflow to acknowledge a request rather than confirm an appointment when that result is absent.
Can I start with lead capture instead of appointment booking?
Yes, start with transferring qualified inquiries to the correct customer record. Keep scheduling with staff until the connection's booking actions and availability checks pass testing.
What information should an AI receptionist send to Housecall Pro?
Send the customer's supplied contact details, service location, requested work, and relevant scheduling preferences. Map those details to fields supported by the actual connection and do not invent missing information.
How do I prevent duplicate customers when connecting the systems?
Match an existing customer before creating a new record using identifiers supported by your connection. Test repeated delivery of the same inquiry and route conflicting matches to review.
Can the receptionist follow up after a customer reschedules?
Automated rescheduling follow-up requires a supported way to receive or retrieve the changed appointment state. Stop messages tied to the old time before sending an update based on the confirmed change.
What should happen when the Housecall Pro handoff fails?
Send the unresolved request to a named workflow owner and avoid issuing a booking confirmation. Inspect the destination before retrying so a completed action is not repeated.
One last thing
Test an unclear response, not just a clean failure. A request can reach the destination even when the originating workflow does not receive a clear result. Inspect the destination before retrying; otherwise, the recovery step can become the duplicate-creation step.